There is no such thing as a typical telephone wiring installation because of factors such as the type of plugs and sockets used (Australian 600-series or modular), the use of parallel or star wiring configurations, the use of DIY extension leads and double-adaptors etc.
Whilst the following diagrams are not comprehensive, they should (in conjunction with a bit of common-sense) assist in helping you to correctly install your ADSL equipment.
The important things to remember are:
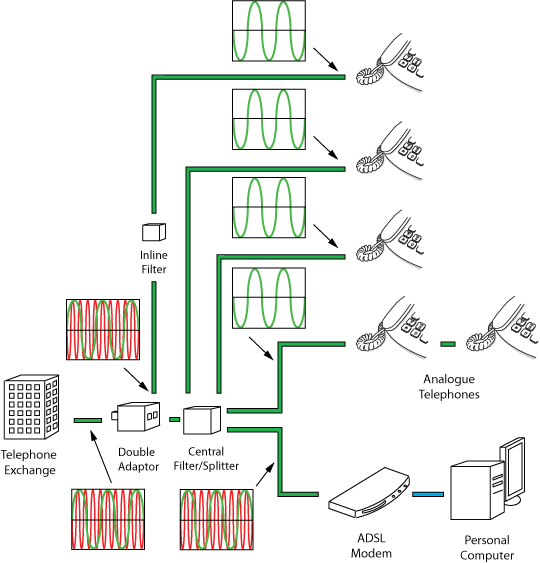
The Filter/Splitter (and your ADSL modem) needs to be connected DIRECTLY to the incoming exchange line and must NOT pass through an In-Line Filter first.
All analogue devices/telephones are connected via an In-line Filter.
Scenario 1.
A single telephone near the ADSL modem with no additional telephones in other locations. Either a Filter/Splitter or a Double-adaptor combined with an In-Line Filter is required.
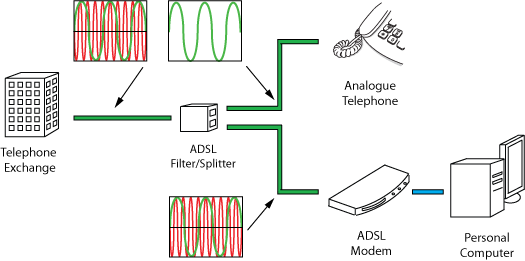
OR
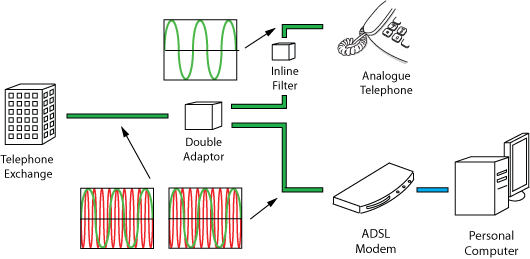
Scenario 2.
A Telephone near the ADSL modem with additional parallel-wired telephones in other locations.
Use a Filter/Splitter plus an In-Line Filter for every telephone.
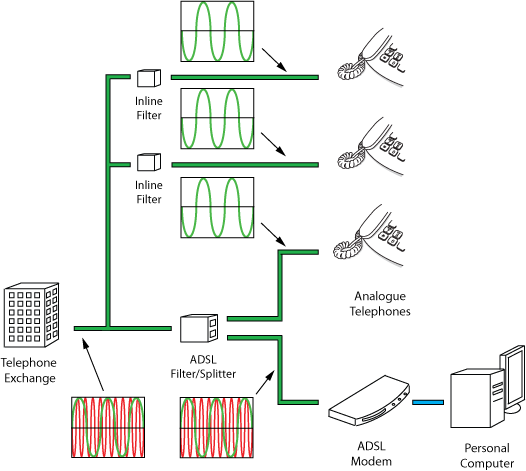
Scenario 3.
A Telephone near the ADSL modem with additional telephones wired back to a "master" socket in star wiring configuration.
A Central Filter/Splitter is all that is required.
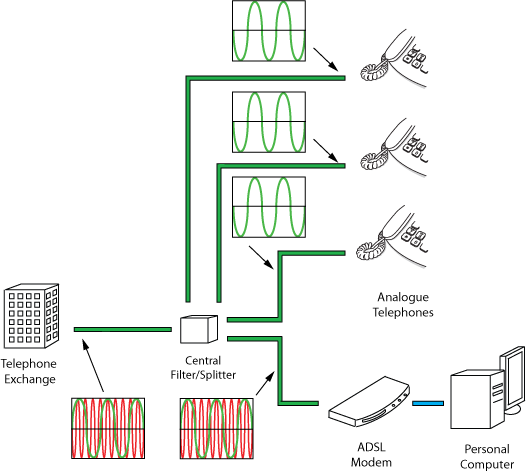
Scenario 4.
A DIY installation using double-adaptors and plug-in extensions cabling from a "master" socket. Double-adaptors, a Filter/Splitter plus In-Line Filters are required.
Scenario 5.
A wireless router installation. A Filter/Splitter plus an In-Line Filter for every telephone is required.
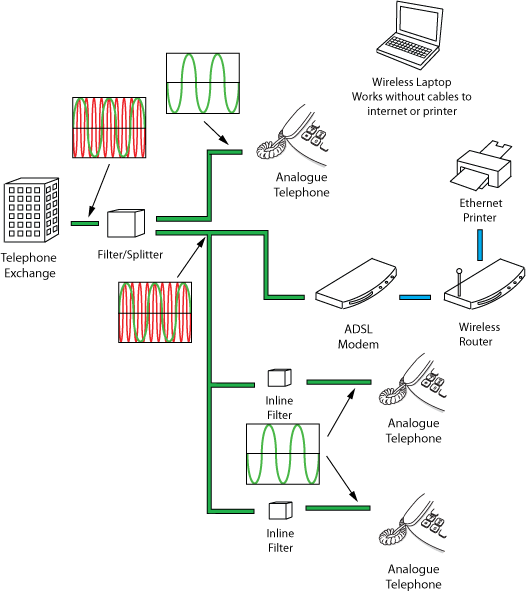
NOTES The ADSL Modem and the Wireless Router can both be replaced by a single Modem/Router. The split configuration as shown is recommended for easy upgradeability. You must have an ethernet compatible printer that will work in conjunction with a wireless router. A standard printer will not work in this configuration. This configuration automatically provides a hardware firewall between your computer and the internet. The laptop must of course be configured to operate on a wireless LAN.
Shop Our Range Today!
Explore our extensive range of Network and Data Cables, Power Cords, Power Supplies, Server Racks & Accessories, Tools and Test Equipment designed to meed your data, security and communication needs.
Experience the Access Advantage
Elevate your data, security, and communications solutions with Access Communications. Our unwavering commitment to quality, expertise, and innovation sets us apart as Australia's premier supplier. With over four decades of trusted service, we offer an extensive range of products tailored to your diverse needs.
Why Choose Access?
- Quality Assurance: Rigorous testing ensures excellence in every product.
- Expertise: Benefit from 50 years of industry knowledge and personalised service.
- Extensive Range: Find solutions for all your requirements, from network cables to custom assemblies.
- Customisation: Tailored solutions to fit your unique specifications.
- Forward-Thinking: Stay ahead with innovative products designed for the future.
- Unmatched Service: Experience unparalleled support and dedication to your success.
Join the thousands who trust Access Communications for their data, security, and communications needs. Explore our offerings and discover the Access Advantage today!
